Create Notes, Tasks from Notes and Labels & Attaching Images
Intro
Just a quick heads up that the following tutorials require a Pro account if you wish to follow along, but please also read through if you are looking to see the capabilities of the DayViewer Pro System.
Now we have set our task up: “Make a Cup of Tea”, next we want to associate more information with it. Maybe a shopping list of the materials needed.
As before following on from the previous Quick Start tutorial, we recommend opening a new browser tab and follow the steps along. It should take about 5 minutes to complete this.
Let’s Make a Note
After logging into DayViewer, Select Notes in the Side Panel Menu
We will once again use the Quick Entry form. (on mobile app click ADD )
Enter “Tea Shopping List” as the Title. Add any short description or just leave blank. Click ADD button to create the Shopping List Note.
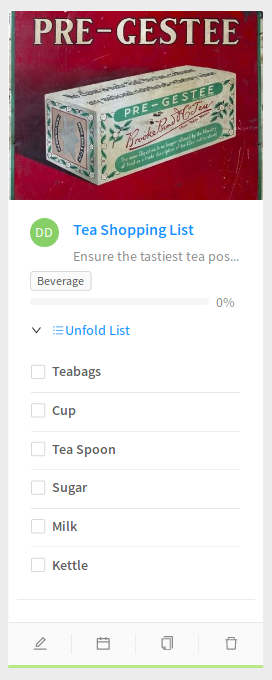
Open your new note by clicking on the Title or the Edit Icon, Next select List and enter a typical list of materials/ ingredients you need to complete the task.
Next save and View your note – it should look something like the image below.

Label Note & Task
Great, we have a note and a task. They are both a very similar theme – let’s tie them up together with a label. maybe “Beverage”
The best way to create a label is to go to the Labels section in DayViewer.
Next, enter Beverage in the Add Label form field. Choose any colour you like for this label

The label has been created now apply it to the entries you need to attach the label to.

You know the label has been applied when the lower border changes to the background colour of the label. There is also a tag with the label name in the Entry Card itself.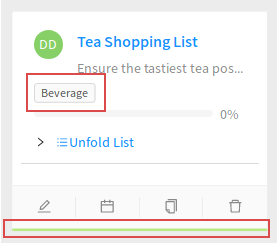
Once that is all done, do the same with the Task we made in the Quick Start tutorial.

Done, we now have a task and note similarly that are bound together by a label – Beverage!
Image Upload to Note
So the brand of the tea is important, whoever goes shopping must get the correct brand, here an image speaks louder than words! Let’s attach an image
Go to Notes section and select Edit in the More tab, click to open the Attachments panel and upload an image of your choice.

Here’s how your note should look (With the checklist unfolded)
Create Task from Note
We can push this note to the calendar – and make it a “Task”, this allows you to use Notes as a template system for quicker task entry.
Go to Notes section, view the Tea Shopping List card in the card view, next click the Calendar Icon in card icon menu
Select a Start Date and duration, and set Entry Type to Task set priority to “Normal”
The other details including list, label, description and label will have copied over from the note.

Once all done, the Tea Shopping task will be present in your calendar at the time specified – adjust times to plan as required!

A handy way to find all tasks with the same label is to go into your Labels area and click on the label.

Summary
It’s great practice that you label entries – it keeps everything organized and easier to find and recall. You can imagine in a more complicated situation where labels could be clients, staff, topics, part numbers, job numbers, locations or departments – in business this is an invaluable tool.
NB: Labels & File Uploads are DayViewer Pro features